Greetings!
In this blog post i'm going to explain how to integrate Kafka with Spring boot. We use Spring boot configuration to send Kafka message in String format and consume it. Let's begin.
(complete example can be found here.)
Here is the docker command to run landoop docker container.
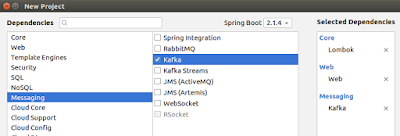
 I'm using Intellij idea IDE to generate the Spring boot application. I have selected web, lombok and
kafka dependencies.
Let's rename application.properties to application.yml to use yaml format.
Here is my application.yml file configuration values.
See the console. You should be able to see something like this.
Navigate to http://127.0.0.1:3030 and select topics where you can see our topic.
In this blog post i'm going to explain how to integrate Kafka with Spring boot. We use Spring boot configuration to send Kafka message in String format and consume it. Let's begin.
(complete example can be found here.)
Starting up Kafka
First of all we need to run Kafka cluster. For this i'm using landoop docker image.Here is the docker command to run landoop docker container.
docker container run --rm -it \
-p 2181:2181 -p 3030:3030 -p 8081:8081 \
-p 8082:8082 -p 8083:8083 -p 9092:9092 \
-e ADV_HOST=127.0.0.1 \

landoop/fast-data-dev
Generate the application
 I'm using Intellij idea IDE to generate the Spring boot application. I have selected web, lombok and
 kafka dependencies.
Let's rename application.properties to application.yml to use yaml format.
Here is my application.yml file configuration values.
server:
  port: 9000

spring:
  kafka:
    producer:
      bootstrap-servers: localhost:9092
      key-serializer: org.apache.kafka.common.serialization.StringSerializer
      value-serializer: org.apache.kafka.common.serialization.StringSerializer
    consumer:
      bootstrap-servers: localhost:9092
      group-id: test-id
      auto-offset-reset: earliest
      key-deserializer: org.apache.kafka.common.serialization.StringDeserializer
      value-deserializer: org.apache.kafka.common.serialization.StringDeserializer
- bootstrap-servers - kafka server instance
- kafka.consumer.group-id - consumer group id which will be used by consumers.
- kafka.consumer.auto-offset-reset - consumers will start reading messages from the earliest one available when there is no existing offset for that consumer.
Kafka Configuration
We already have configured basic properties. In addition to that we are going to create our Topic.@Configuration
public class KafkaConfiguration {
public static final String TOPIC_NAME = "kafka-spring";
@Bean
public NewTopic topic() {
return new NewTopic(TOPIC_NAME, 3, (short) 1);
}
}
Produce Messages
Spring provides easy to use KafkaTemplate to send messages to Kafka. We need to provide topic name and our message.
@Component
public class KafkaMessageProducer {

    private static final Logger LOGGER = LoggerFactory.getLogger(KafkaMessageProducer.class);

    private final KafkaTemplate kafkaTemplate;

    @Autowired
    public KafkaMessageProducer(KafkaTemplate kafkaTemplate) {
        this.kafkaTemplate = kafkaTemplate;
    }

    public void send(String message) {
        LOGGER.info(String.format(":: Produce Message :: %s", message));
        kafkaTemplate.send(TOPIC_NAME, message);
    }

}
Consume Messages
With Spring's KafkaListener, we can easily consume messages by specifying topic name and group id.
@Component
public class KafkaMessageConsumer {

    private final Logger LOGGER = LoggerFactory.getLogger(KafkaMessageConsumer.class);

    @KafkaListener(topics = TOPIC_NAME, groupId = "test-id")
    public void consume(String message) {
        LOGGER.info(String.format(":: Consume Message :: %s", message));
    }

}
Test it
Now all set. Let's create a simple end point to send few messages.
@RestController
public class MessageController {

    private final MessageService messageService;

    @Autowired
    public MessageController(MessageService messageService) {
        this.messageService = messageService;
    }

    @PostMapping("/send")
    public void sendMessage(@RequestBody Message message) {
        messageService.sendMessage(message.getText());
    }

}
curl -X POST \
  http://localhost:9000/send \
  -H 'Content-Type: application/json' \
  -d '{ "text": "Hello Kafka" }'
See the console. You should be able to see something like this.
2019-05-01 22:09:28.062  INFO 6045 --- [nio-9000-exec-4] c.s.k.message.KafkaMessageProducer       : :: Produce Message :: Hello World
2019-05-01 22:09:28.069  INFO 6045 --- [ntainer#0-0-C-1] c.s.k.message.KafkaMessageConsumer       : :: Consume Message :: Hello World
Navigate to http://127.0.0.1:3030 and select topics where you can see our topic.

What is the class MessageService
ReplyDeleteWrapper for KafkaProducer. It's in sample
Delete